Today we’re honored to share a guest post from one of our friends and audiences members. Niek has an unusual approach to painting his Iron Warriors which results in some really lovely models without too much work. His approach is a little more colorful than most but makes for visually stunning force!
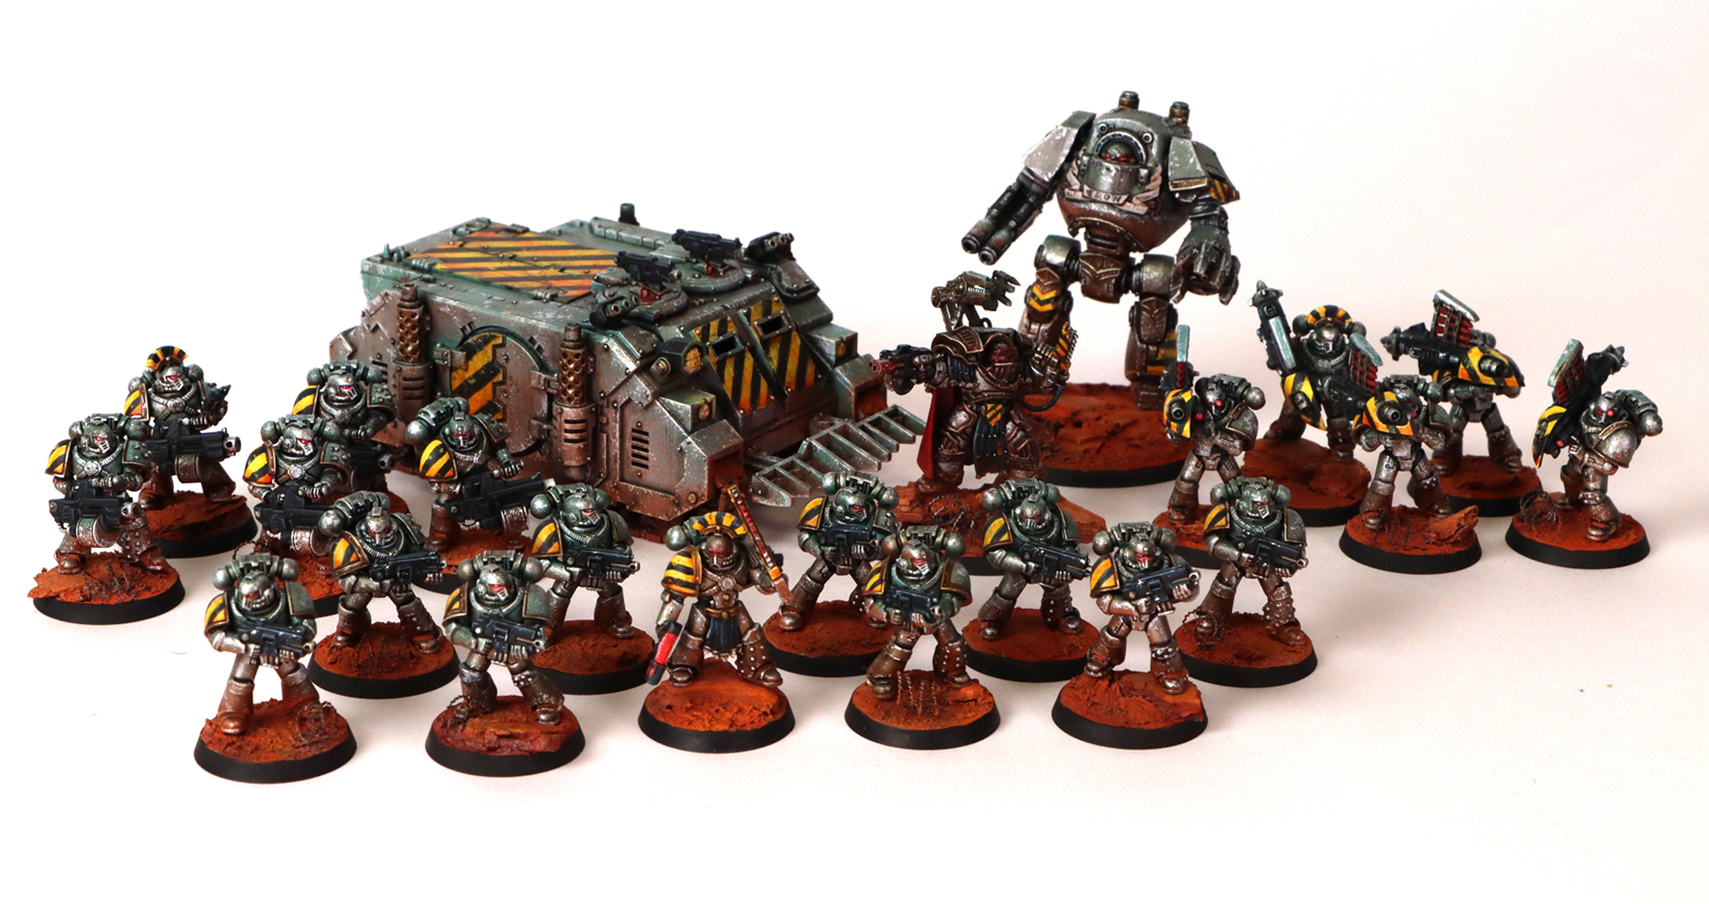
What’s up Galaxy in Flamers! I’m Niek and this is my first article for GiF. I am new to Horus Heresy but have always loved the aesthetic of the setting and its Marines. I have played miniature games since 2006 and started with Games Workshop products in 2023. In this article I’m gonna show you how I paint my Iron Warriors.
I love vibrant and contrasting colors. Most of my models use a lot of teals, yellows and pinks. Then, why did I choose Iron Warriors, you might ask? In short: because I love their over-the-top bitterness and brutal style of warfare. So I wanted to paint Iron Warriors, but wanted to make sure they were visually interesting and vibrant.
This is why I started looking at how people paint metallic colors and I was very intrigued by sky-earth non-metallic metal. A mouthful, but in short, metallics painted to emulate the effect of the earth reflecting in the lower parts and the sky reflecting in the higher parts.
Because it is a huge pain in the power pack to paint for one model like this, let alone a mass army, I needed something quicker and dirtier. Which is why I came up with the approach below. I’m a super slow painter and but I managed to paint a unit of 10 of these in a weekend. This is lightning fast by my standards.
The approach has a number of steps that could be easy to cut if you want to make it faster.
Step 1: Priming

1. This is arguably the most important part! I start with a zenithal prime of white over a black base. This is to make sure the later colors will be vibrant while laying the foundation for the gradient.
2. I spray the model from below with an orange spray can from Amsterdam paints. (Reflex Orange)
3. Then I spray it with a teal spray can. (Turquoise Green)
This establishes our gradient. I know, it looks terrible now, but for this to work, you need to see it through. Until the last couple of steps, these models are going to look terrible.
Step 2: Silver
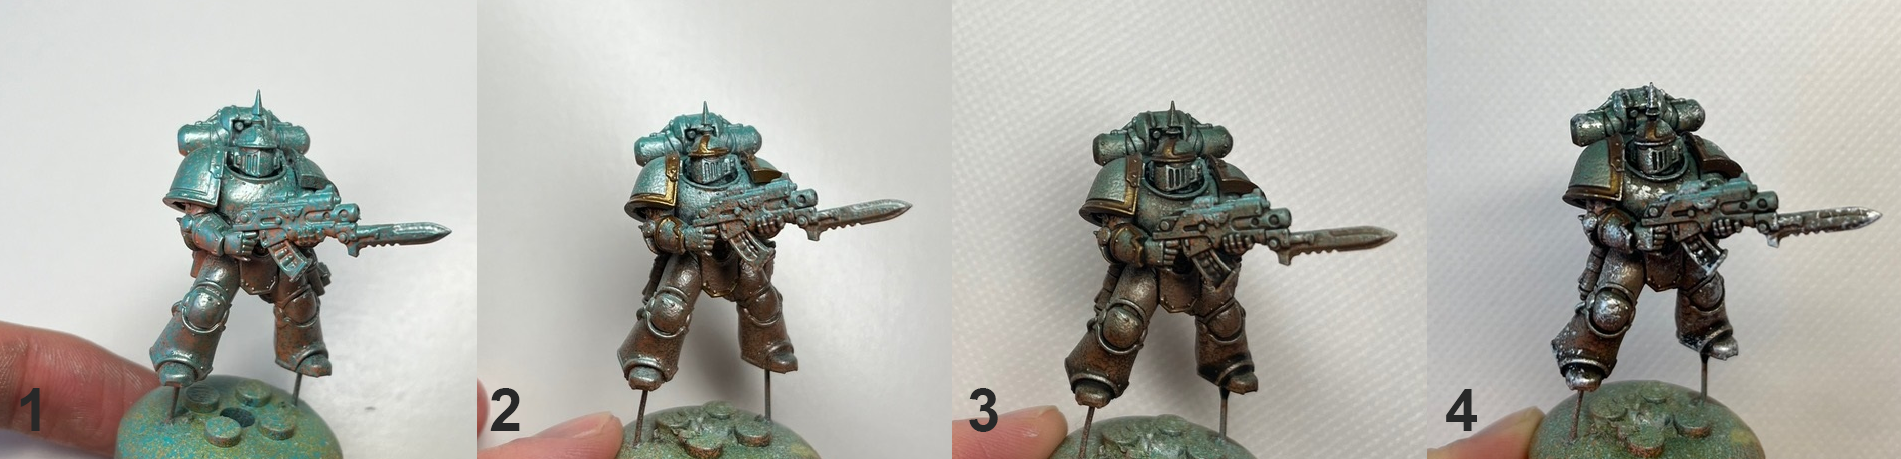
1. I airbrush the whole model with Scale 75 Thrash Metal, thinned down a bit more than you’d normally do. I make sure the gradient still shows.
2. I paint the brass trims with Scale 75 Viking Gold. This is just to make the later work on this color easier.
3. I washed the whole model with a 2:1 mix of Agrax Earthshade and Lahmian Medium. This helps to separate all the different elements on the figure and makes the metal look nice and worn down. On a larger model I give it a coat of gloss varnish followed by a dark brown oil wash as it’s easier to work with on large surfaces.
4. The last touch for the silver is a stippling of Scale 75 Speed Metal. I use a little piece of foam ripped into a nice point. For hard to reach places, I use an old, worn down small brush and stipple with that. Don’t worry too much about touching the brass portions of the model.
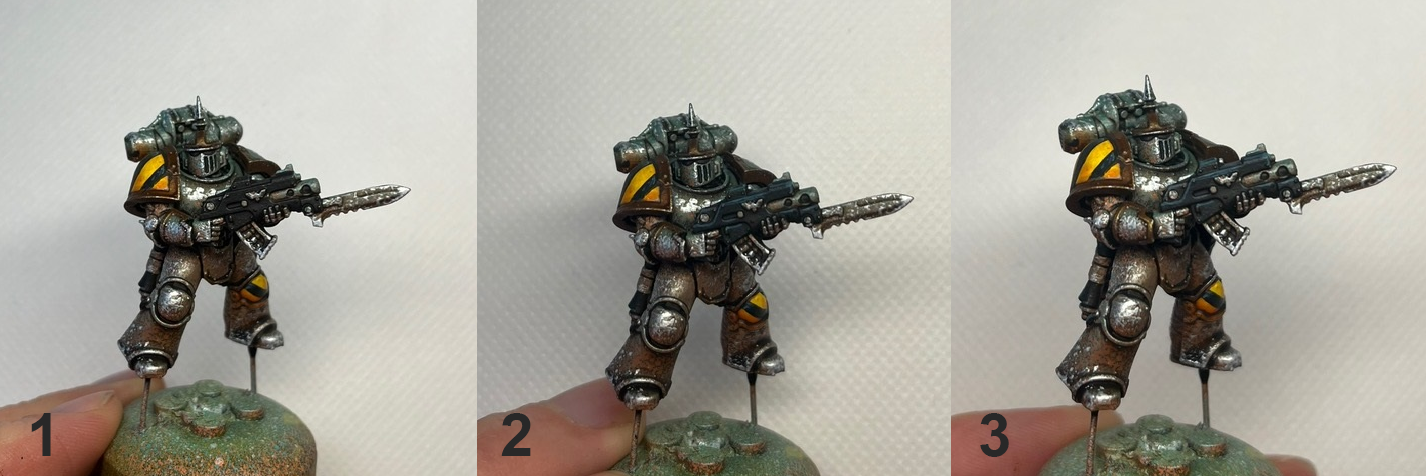
Step 3: Yellow and hazard stripes

1. I start with 3 very thin layers of AK White. I keep building this up until it becomes a nice solid white.
2. With a solid base, it should be easy to get a nice bright yellow with just one or 2 glazes of AK Yellow.
3. I shade this using Fuegan Orange, making sure to use a second brush to take away the excess on the raised areas.
4. I mix 1:1 Vallejo Black with P3 Coal Black and carefully paint on the stripes. It doesn’t have to be perfect. On larger models, I use a pencil to sketch the lines first.
5. I highlight it with pure P3 Coal Black.
6. For the final highlights, I add white to the yellow and black mixes and paint some scratchy lines on top.
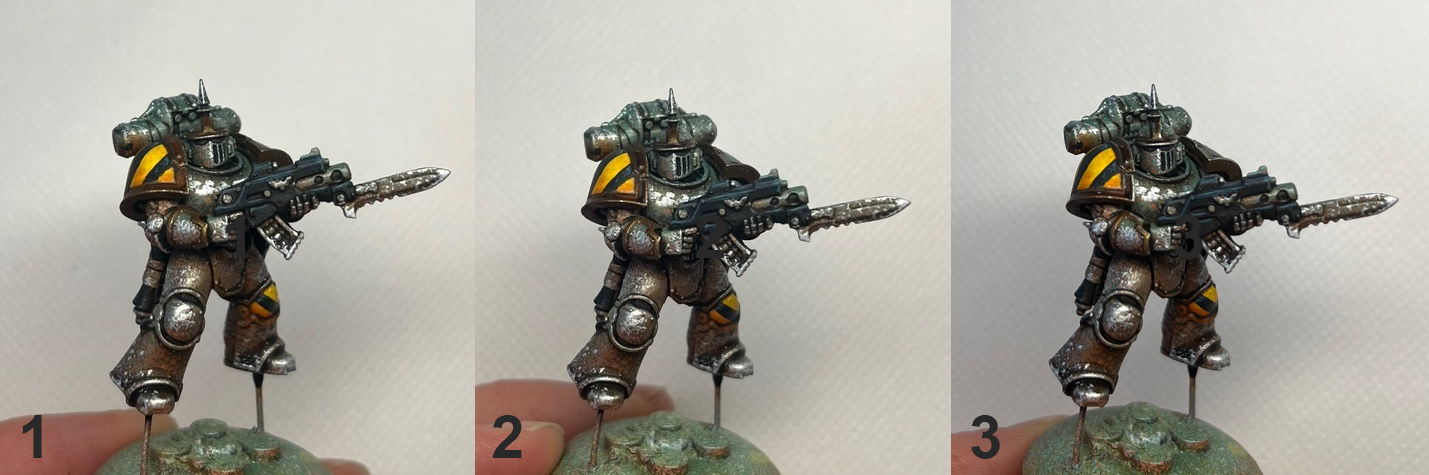
Step 4: Black
1. For the bolter, under armor and tubes, I paint a base of Vallejo Black.
2. I highlight it with P3 Coal Black.
3. Like before, I add a bit of white and do the final highlights.
Step 5: Brass (optional)
1. This step is in case you don’t like the silver that got on the brass parts. So it starts with touching up with Scale 75 Viking Gold.
2. A wash of Agrax Earthshade to knock it back and black-lines between the brass and silver portions of the models.
3. I do a final highlight of Scale 75 White Gold in a combination of edge highlights and scratches.
Step 6: Glow
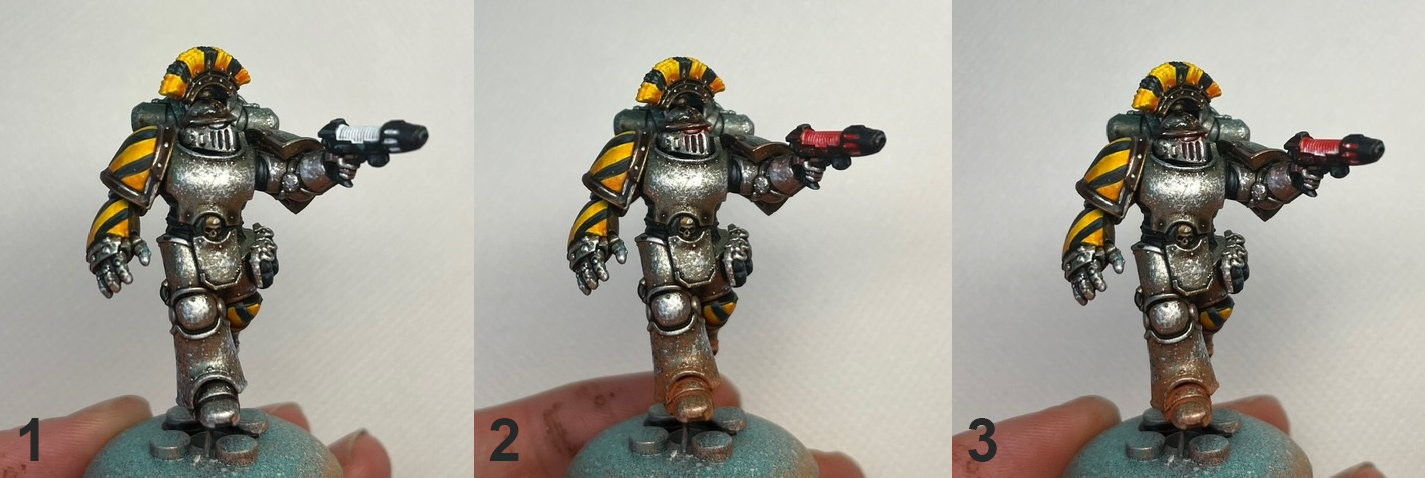
1. For this super rough OSL (Object Source Lighting), I thin down AK White again and carefully paint it into the eyes, lenses and plasma weapons. Build up a solid white with a couple of coats. For the eyes I make an effort to avoid the edges of the eye sockets by painting a small ear drop shape in the middle with a pointy brush.
2. I thin down some P3 Red Ink 1:10 and glaze it in and around the sections I painted white in a couple of layers. I use a second clean brush to feather out the glaze.
3. I bring back the bright center by putting a tiny dot of white where the light shines the brightest.
Step 7: Base
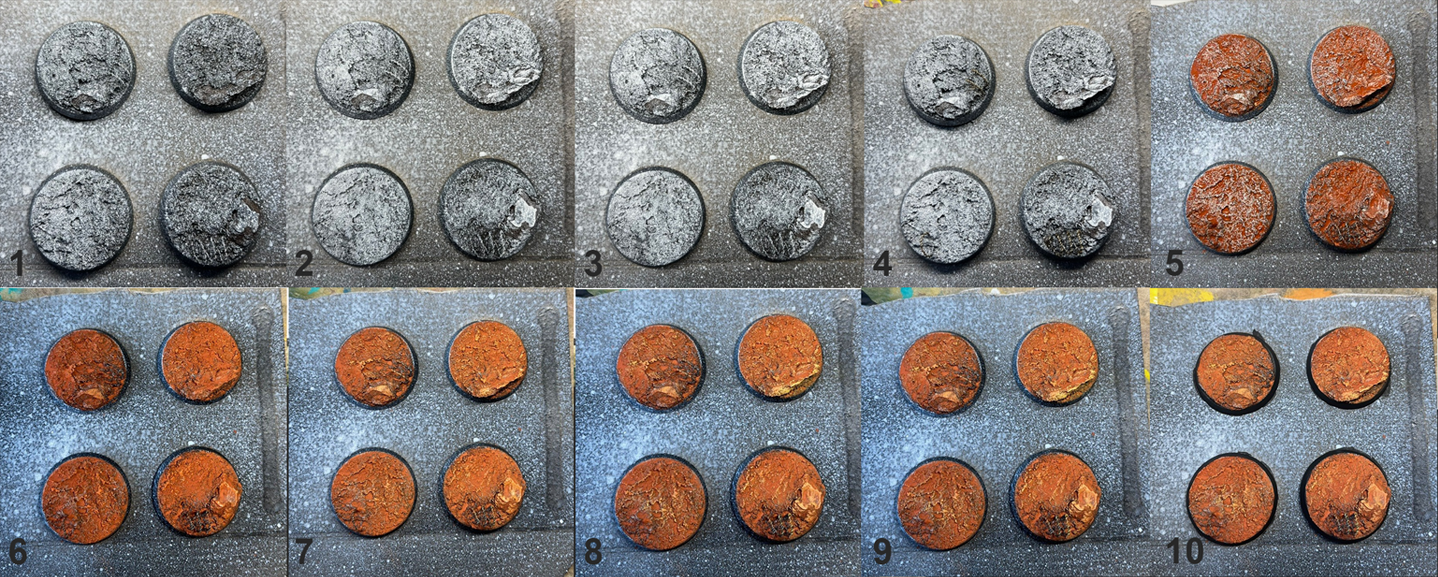
The base is very important for this style as it represents the earth reflected in our sky-earth bastardizationtechnique.
1. Again we start with a zenithal of white over black.
2. I drybrush on AK White.
3. I paint the barbed wire Scale 75 Thrash Metal.
4. Like all good things, it gets a wash of Agrax Earthshade.
5. I thin down some Vallejo Dark Red Ochre pigments, 1:2 with water and slather it over the base, don’t be scared of getting some on the barbed wire.
6. Once this is completely dry, it gets a drybrush of Vallejo Clear Orange.
7. I mix in 1:1 P3 Sulfuric Yellow for another drybrush.
8. One more drybrush of pure P3 Sulfuric Yellow!
9. To bring back some saturation, I thin down some P3 Red Ink 1:10 and glaze it around randomly.
10. I finish them off with 2 coats of black on the base rim.
And that’s it! I do a little bit of weathering with a piece of foam and some dark brown paint on the yellow and some yellow chipping on the black, but that’s entirely optional. So this is where you glue your guys to their bases and get gaming! (Full disclosure, I have never played a game of 30K or 40K.)
Thanks Simon for giving me a platform for my creative musings and for answering my never ending Horus Heresy questions!
Until next time!